Showing posts with label tutorials. Show all posts

Tutorial Tuesday - upcycled cork clocks - time around the world

I have a bit of a clock and time obsession and have always wanted a string of clocks on my wall to tell me the time in different places around the world.

A few years ago I bought some black plastic clocks from the end cap sale bins at Target, but the loud tick-tocks drove me bonkers and I eventually gave them away.

The clock kits you can buy at craft stores are alot quieter and the cork helps muffles the sound. I've had these cork plant trivet/coasters that have been itching for another use - so time to make some clocks!

For this little project you will need:

a drill
3 cork plant trivets (Ikea)
3 metal house numbers
thumb tacks
3 sets of clock hardware

1. Measure for the middle of your cork circles and mark your holes
2. Drill holes
3. Add clock hardware (easy peasy, but this stuff is very delicate so be gentle)
4. Thumbtack on your numbers and names


Or you can buy something really cool on Etsy like one of these amazing clocks by:

1. andfurthermore 2. decoylab 3. tecoart 4. imotime 5. oryxandcrakedesign 6. giftedpapers

Recycled Book Book-Rack DIY Upcycled Tutorial

By now I am sure you are thinking that I am obsessed with drilling into books, but I really do love my books and hate to put holes in them ....

(maybe I need a 12 step)

Here an old book easily makes a great little bookrack that you are going to love!

This also allows you to stand up some books on a shelf that may be a bit too narrow for them.

what you need:

a hard cover book that you have already read
2 hardware handles (not sure what these are called, I got them in the hardware store near the drawer pulls and hinges)
4 bolts
drill, drill bit that is larger than your handle hardware

1. measure your hardware and mark your drilling holes
2. drill slowly and firmly
3. drop in your handle hardware
4. bolt underneath and on top
5. add some books


And some amazing Etsy finds for you bibliophiles:


1. Leather Journal by Julie Boyles
2. Great Rules of Writing Wood Notepad by Quotes and Notes
3. Unblocked Tee by Citrus Tree
4. Keep Calm and Read On by KeepCalm Shop
5. Eco-friendly Chalkboard by HalfpintSalvage

DIY Upcycled Flea Market Finds - Door Handles

This week's tutorial had to be put on the back burner since I am still finishing up my tradeshow display that needs to ship out in about 48 hours ... ugh!

Hopefully, I will be back on track next week, in the meantime here is a great way I have gotten to use one of last month's flea market purchases.

These are two vintage letterpress pieces (I had a major coup earlier in the summer with a ton of these) reused as armoire door handles.

Almost anything can be a drawer pull or door handle and even just mixing and matching pieces like the 2 samples shown below on the right can make a big difference. If I'm using real drawer pulls I like to just change 1 pull to add some interest and whimsy and save a few bucks since the nice ones (like those from Anthropologie) can be pricey.

Kids vintage blocks and rubber stamps would work great, too! And there is always some amazing inspiration on Etsy:


1. Still Memory's amazing photograph Exit
2. Monkeyshine's brushed nickel draw pull with vintage crab
3. 1950's hardware store cabinet at FrenchbyDesign
4. Letterpress fist from TurnersCollectibles
5. Pink painted mahogany chest by Rubyrhino1

Vintage Rolling Pin Towel Rack DIY Upcycled Tutorial

I have been wanting to add a towel bar or two to my kitchen butcher block counter (which was originally a potting shed cabinet) for a long time.

I recently picked up a couple vintage rolling pins at a flea market and knew they would be just perfect!

I had some hardware left over from this bottle project last Christmas, but you can easily pick some up in the electrical or plumbing department of your local hardware store.

Plus it spins when you pull the towel - how cool is that!

you will need:

a rolling pin
2 galvanized split ring hangers (bring rolling pin to store for sizing)
2 3/8" galvanized ceiling flange (plumbing or electrical department),
3/8 threaded pipe cut to size (store will cut),
(4) #12X1" screws
measuring tape, screwdriver and drill

1. measure for placement
2. measure twice!
3. mark and drill screw holes
4. screw in ceiling flange and then add threaded pipe
5. add split ring hanger with rolling pin


Now head over to Etsy and get yourself an amazing handtowel:

1. the heated advice by theheated
2. pistol bar towel from branchhandmade
3. mr. darcy proposal hand towels by brookish
4. kitchen bits tea towel by wonderthunder
5. organic summer pennant tea towel by katherinejlee
6. essential herbs kitchen towels by nestahome
7. mussel organic linen tea towel by madderroot

see lots of other great upcycle projects HERE

Heating Duct to Amazing Mail Holder DIY Upcycled Tutorial

This is another easy-peasy summer project for an old metal vent.

Why not turn it into an awesome little mail holder?

The plastic diffuser (magnetic) can be picked up at a hardware store for under $5.00.

I attached mine to the side of a desk and love it so much I am going to add a few more!

you will need:

1. metal vent
2. magnetic plastic air diffuser (hardware store about $5.00)
3. spray paint for metal
4. screws and screwdriver
5. drill (camera shy)

1. Clean your vent and spray paint it
2. Measure for placement on the wall, side of desk, etc
3. Mark holes, drill for screws
4. Screw in your vent
5. Add your magnetic plastic cover (note I switched mine to some stronger magnets since I wanted it to hold quite a bit of papers)

Upcycled DIY Tutorial Golf Ball Keychain!

When I was a kid we were told that something incredibly toxic

(yes, even more toxic than the gazillions of toxins we faced all the time)

and incredibly yucky was at the center of a golf ball.

My sister and I had peeled one or two (dozen) open and gotten to the gigantic rubber band inside the hard outer shell, but never ventured into the "poisonous" golf ball center.

Recently I wanted to make a few golf ball keychains for a neighbor who has a business making golf club grips - just little giveaways he could pass on to some of his customers.

When I mentioned my plan to drill into a golf ball, hubby reminded me to check and see just what is in the center of one of these things.

(I didn't want to cause some kind of nuclear meltdown or chemical explosion with my drill, after all)

Well, it turns out the liquid center of most golf balls today is a not-so-liquid solid core, but the old liquid center balls are still around and preferred by the pros because they give better control and feel.

So, what is that mysteriously hazardous liquid anyway?

Salt water and corn syrup. Just another of those doomsday scenarios created by parents intent on getting us to not destroy our their stuff (it never worked).

what you need:
1. a golf ball
2. a drill
3. keychain slip rings (1 tiny, 1 large - sorry this is about as specific as I will be able to get since I have long ago tossed the packages)
4. eyehook & washer

1. mark your hole - check for front placement of insignia
2. drill your starter hole
3. screw in your eyehook and washer
4. add your slip rings

Totally easy peasy, but could make a great little gift for your favorite golfer!

Note - if anyone wants to make one, but doesn't want to go out and purchase the individual pieces - contact me through the mail link on the right of this blog or through convo and for $5.00 (includes shipping) I will send you a little kit you can assemble. I'll even pre-drill (while supplies last, I have a few left).

Upcycled DIY Tutorial - Make a Whiskey Barrel Lid LAZY SUSAN

I have always wanted a lazy susan -

(without actually nicknaming myself Susan, of course)

I think because my mother had one,

(and I have lots of fond memories of spinning salt and pepper shakers around the table)

but since my dining room table is kind of large and most lazy susans are kind of small, I could never find just the right one.

Recently at a local flea market my daughter spotted this whiskey barrel lid that we knew would be perfect.

I had to google lazy susan to see how you make one of these things spin, but it turns out there is a gizmo called - yup - lazy susan hardware, which is available at - yup - your local hardware store.


what you need:

1. something for your lazy susan top (ex. barrel lid)
2. lazy susan spinner hardware
3. screws and washers
4. the base for your lazy susan- here I have used an old book (I am not sure I am recommending this since I see some challenges ahead with it, but I have alot of old cookbooks)

First I had to make some adjustments to the back of my barrel lid including removing some hardware that had recently held legs- so I guess my barrel lid had been a table, too. Then I needed to cut some pieces of wood the right size to attach the lazy susan gizmo. If your lazy susan top is flat on the bottom you won't need to do these things

(just make sure the top is deep enough that your hardware is not going to show through)

1. Mark and drill holes in your lazy susan base (in this case the book)
2. Screw the lazy susan gizmo into your base
3. Flip you base over and mark, drill and screw your lazy susan gizmo into your top


There are some tricks to making sure the base is the correct size so that you can work around it when attaching your top - when you buy your little gizmo you will see what I mean. I had intended to use a larger book and ended up needing a smaller book.

Can't wait until the next family get together so I can "spin" the condiments at everyone - just like mom used to do!

And some lazy susans and other susans you can buy now:

1. black eyed Susan eco felt earrings by akaCINDERS
2. black eyed Susan organic cotton t-shirt by threadhead99
3. always loves me flower necklace by taylorseclectic
4. curly maple lazy Susan by appcraftsmen
5. changing of the seasons lazy Susan by backwoodgalleries
6. orange slice lazy Susan by JaneSuzanne
7. black eyed Susan by TheDoomGirls

Upcycled Shovel and Pitchfork Planters DIY Tutorial plus those flea market bargains find a new usefulness

First a quick update on the new lives of some of my recent flea market finds, although the bicycle wheels are just taking a little pitstop ...


1. more little golden books for our book wall - pants hangers from Ikea
2. this horseshoe has a nice new home bringing us some good luck
3. vintage doorknob plus cork = cool new bottle stoppers
4. bicycle wheels make a great temporary seed holder
5. vintage mallet makes a perfect little bookend
6. old baseballs + stampings = a total homerun


Now, this tutorial is almost too easy peasy to call itself a tutorial,

but since everyone who sees mine goes home and makes one, I won't let that stop me!

Your rusty old shovels and pitchforks can be easily turned into great planters that will add some whimsy and old-time farm magic to your garden!


what you need:


1. empty coffee cans
2. screws, washers, screwdriver
3. metal straps from hardware store
4. some rusty old farm tools
5. your drill


1. the cans can be double strapped (top and bottom) or double screwed into your shovel or pitchfork handle very easily
2. pick a great spot in your garden that needs a little height and gets enough sun for your plantings
3. add your plants and a garden gnome to keep watch and you are all set!


And check out some amazing gardener goodies on Etsy:

1. Succulent seeds by PlaidPigeon
2. I dig dirt toddler tee from RoundBottomBaby
3. Green thumb locket in my Polarity shop
4. Rusted handmade ceramic herb markers from Glazed Over
5. Woodland Waldorf Gnome from MariaAsenova
6. Work With What You've Got collage by TinyArtbyJMullin

Upcycled DIY Tutorial - A Log Table & Chalkboard Sign or what to do when you need to cut down those trees


A couple weeks ago, we had to cut down 5 trees - it was a hard day for us me.

George was very certain these trees were going to crash down on our heads and we have had enough trees fall over the years, including one that hit our neighbor's garage, to take our tree problem seriously.

You can see from the holes in these poor trees that they had seen better days, but it was very hard for me to make the decision to cut them down.

This decision was not so hard for hubby who longs for any reason to use his mostly idle chainsaw.

(for a man who likes to makes things, he really likes to "unmake" them, too)


I have a few projects planned for some of this wood and the rest is being picked up by some friends with fireplaces. I saw these log stools in a magazine and knew I would be making one for us and a couple for other people.


You will need:

1. a log that has been cut to be level
2. your handy drill
3. 4 swivel casters

(if you are going to sit on this log you may want bigger casters than these and longer screws)

4. screws, screwdriver and marking pen


1. Lay out your swivel casters fairly close to the edge of your log
2. Mark your drill holes

(I actually skipped this step and just drilled through the caster holes, but this could be a good step if you are a litle less lazy than I am)

3. Drill your screw holes
4. Screw on your casters
5. Flip your table
6. Voila- and this is a heck of alot easier to move around than the heavy log is!

BONUS PROJECT - WELCOME SIGN
Using a round template paint a chalkboard onto a slice of wood- add a little welcome message!


And for some amazing Etsy creations you can buy now- check out:


1. Log #20 original water color painting by Gollybard
2. Personalized carved initials necklace by Lisa Hopkins
3. Tiny wee hoot owl by Buttercupbloom
4. Tagua nuts eco-friendly earrings from Decorate the Diva
5. Custom tree heart pillow by Cozyblue
6. Pileated woodpecker by StudioLyon

Upcycled DIY Tutorial - Cookbook and Spoons into a Spice Pinch Caddy!


Now, Martha likes to keep those little bowls of salt and pepper handy for adding pinches while she is cooking

(and she is the queen of all things crafty after all)

and it is a great idea!

So, this is my version of Martha's pinch bowls.

You will love having open spices to add to your favorite soups and sauces as you cook!

And this is an easy, peasy upcycled project.

You will need:

1. a hardback used cookbook
(make sure you copy any recipes you like first)
2. old spoons (use ladles or you will have to bend them, which is easy actually- just bend slowly)
3. a large sawtooth hanger
4. 4 screws, washers and bolts
(the screws need to be just a wee bit longer than the depth of your book)
5. 2 copper pipe hangers (bring your spoons to the store when you buy them)
6. a drill and hammer (camera shy)


1. measure and hammer in your sawtooth hanger
2. line up your spoons and copper pipe hangers and mark your hanger holes (I wanted my copper pipe hangers to be in different places so bent one spoon slightly)
3. drill your starter holes and drill holes slowly

(remember this is how you started a fire when you were a girl scout, so drill SLOWLY)

4. screw in your hangers and add bolts on back
5. add your spices and you are all set


Here is another recycled book post you might like Baby Got Book.

And some amazing creations you can buy now on Etsy:


1. Gorgeous and clever recycled spoon necklace from Under Glass.
2. The Black Spot Books stunning handmade leather library
3. Beautiful spoon garden marker by Monkeys Always Look
4. Amazing book safe by Pommesfrites
5. Adorable mini wooden library book by Elloh

A License Plate to Dustpan DIY Recycled Tutorial - Time to Clean Up!

In New Jersey if you do not turn in your old license plates you face huge fines and can even lose your driver's license,

(so, don't ask me where I got this one - I actually have about 10 in a backyard shed which I am hoping the police don't stumble upon, if one of my neighbors - jealous of my crafty nature - turn me in)

but if you live in a state that is not quite so greedy about getting these back and happen to have one that you are not using why not turn it into a handy little dustpan!
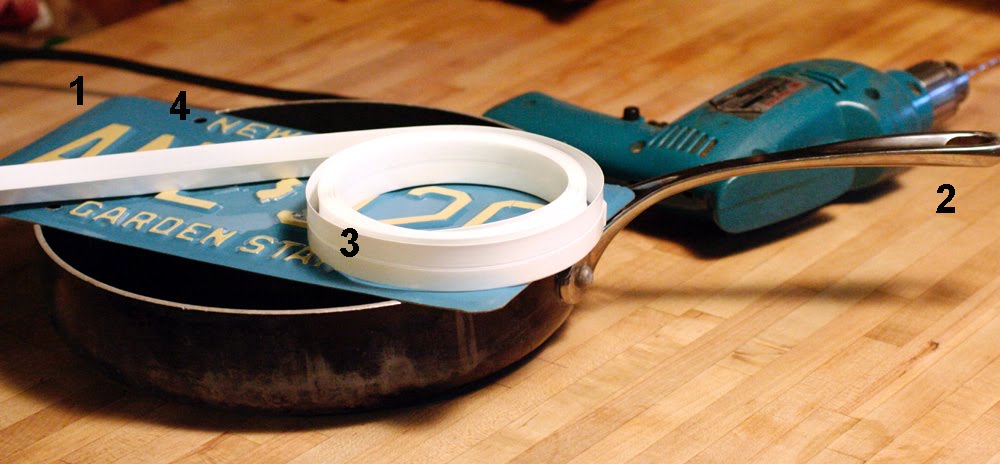
You will need:

1. a license plate

(please do not steal this from your neighbor or mother-in-law)

2. an old handle- I removed this one from an old frying pan that I ditched due to teflon and have been trying to recycle
3. 11 1/4" of weatherstripping
4. new bolts for your handle- complete with washers and nuts
5. a drill, some clamps and a marking pen

1. determine the size of the 'fold' for your plate based on your handle and clamp your plate to the edge of your work table upside down
2. gently and firmly bend your plate - working your way a little bit at a time across the plate- slight bends; you will probably need to bend across the plate 3 or 4 passes - if you have a rubber mallet - it could come in handy here

(note - I have a rubber mallet and spent more time looking for it than making this dustpan and of course, it only turned up the next day when I didn't need it anymore)

3. measure and mark your handle holes
4. if you are using large bolts- drill a starter hole with a small drill bit and then drill your larger hole with the correct size bit
5. remove your clamps and bolt on your handle


6. cut your weatherstripping to size
7. peel off the sticky paper from the one side of the stripping and press the edge of your license plate on top of it
8. make any final adjustments to your license plate fold and you are done!

And for some amazing recycled license plate creations you can buy now check out this total gorgeousness on Etsy:


1. Journey license plate word block by Recycled Art Company
2. Recycled license plate monogram necklace by Wearwolf
3. Quebec license plate photo album by Tagliatela
4. Say What? license plate belt buckle by Vintage In Retrospect
5. New England Girl license plate bracelet by Etcetrix
6. License plate frame by RandiTan