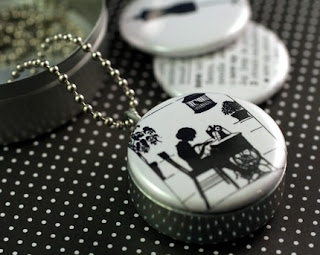
Polarity Locket Saves Motorists...and Marriage....


I received a wonderful little email yesterday from a customer who had recently purchased a magnetic locket from my Polarity shop. Here is her story:

Hey, I LOVE my new necklace. It's about to go into heavy rotation in my jewelry collection. I also thought you'd like to hear...it was helpful as part of replacing my husband's car battery this weekend. Here's the tale: After MUCH swearing, he finally was narrowing down which ratchet to use...and then promply dropped the thing (like 1 in big detachable ratchet part) into the innards of his Jeep. More swearing. I was standing (far back) watching all of this and then remembered that (!) I was wearing a magnet necklace. So, I took off the front cover and lowered the pendant into the Jeep by holding onto the chain. Sure enough, I managed to get the ratchet part out and the battery got changed (eventually and with minimal extra yelling from my man, bless his heart) So, there you go...pretty AND functional! Thanks a bunch!

Just another day in the life of a Polarity recycled magnetic locket ........

Chicken Donation RESULTS

My customers are simply the best! During my 3 day chicken donation on Etsy over Thanksgiving weekend- a chicken donated to worldvision.org which provides a family with a continuing source of nutrition and income - for any customer who purchased 3 items between my 2 shops- the final chicken donation tally was 15! My own little chicken Lucy, who started it all, would be so proud!

Shout Out from Whip Up!


Thanks to Whip UP for this shout out- check out their amazing site!

How to Make Amazing CORK Christmas Tree Ornaments

While you are getting merry this season with your favorite bottles of red and white - start saving your wine corks (you may already have a nice little collection) and turn them into amazingly awesome Christmas tree ornaments. Cork is the bark of the cork oak tree. Most cork is grown in managed forests, primarily in Portugal and Spain, where the cork is carefully harvested in a centuries-old tradition using hand tools and without pesticides or fertilizers ensuring the trees will remain undamaged. So remember to support this amazing industry by buying your wine with cork stoppers!

To make these little beauties you will need:

Corks, Buttons, Glue, Pleather Cording, Eyehooks, Slip Rings and Some Cute Little Christmasy Things to Hang From Your Corks

1. Start with a button that is about the size of your cork or a bit larger and thread it with a strand of pleather from the bottom up
2. Stack on a few more buttons and tie it off. Give your pleather a few more inches for hanging and trim.
3. Using a pair of sharp little scissors dig a little hole in the top of your cork so your bottom button sits flat
4. Glue the button to the cork and let this set
5. Twist an eyehook into the bottom of your cork and add a slip ring
6. Now you are ready to add any cute little Christmasy things you can think of to dangle from your corks

REwrapping this year - Boxes and Bows

Go green instead of spending green this year!

You will need: Scrap paper (a colorful magazine page looks great), cardboard packaging (here I am using a dog food box), scissors, stapler, twine, paper cutter (or ruler), glue

1. To make the bow cut several strips of paper down to 8.5" X .75" and one piece to 4" X .75
2. Loop each strip ends back into the center and staple
3. Staple all your looped pieces together at 90 degree angles and top off with the 4" piece looped and stacked on top
4. Flatten out your cardboard packaging
5. Find the glued side and carefully separate the cardboard to open the packaging
6. Turn the box inside out and reglue it back together (or tape it if you are going to cover the box)
7. Telephone book pages run through a paper shredder make a great replacement for tissue paper
8. You can now decorate your box to your own style- or keep it simple with some twine and your recycled bow!

Black Friday thru Cyber Monday (otherwise known as Thanksgiving weekend SPECIAL in honor of LUCY)

I once had a chicken named Lucy. She appeared in our yard one day and kept trying to get into our house by flying into the windows (unopened windows...ouch, poor Lucy!). My generous hubby would walk around the yard with Lucy at his feet looking under rocks for crickets. This next part gets a little gross. He would toss the cricket on the ground to stun it and then Lucy would gobble it up - hey the girl had to eat! She would jump into our laps when we sat on the patio and nibble on our toes when we ignored her. Our dog Hershey would chase her around the yard and she would fly atop the patio umbrella to get away. When fall came (and the chicken clean up got a little too much- chickens require a lot of clean up, if you know what I mean) we took Lucy to a farmer down the street named Junebug where she lived happily ever after with other chickens and one lucky rooster, laying a gazillion eggs for farmer Junebug.

When Etsy announced a Thanksgiving weekend site-wide super-sale I somehow thought of Lucy ... I mean Lucy wasn't a turkey, but she was the closest friend to a turkey I have ever known ... So I have decided to participate in this sale in honor of Lucy. I will be offering customers a free I AM A GOOD EGG cork small necklace as well as donating 1 CHICKEN (yes, as in cluck, cluck) to World Vision (the gift of a chicken will provide a family with a lasting source of nutrition and income. Fresh eggs raise the levels of protein and other nutrients in a family’s diet, and the sale of extra eggs provides money for other household needs) with their purchase of any 3 items between my 2 shops from Black Friday through Cyber Monday. Hoping to donate a little flock, clutch, peep, brood - what the heck do you call a bunch of chickens anyway?!

New Stuff Added to My Shops This Week


This is my new Spread Your Wings butterfly mini recycled magnetic locket set - that was a mouthful! - I am feeling a lot like spreading my wings lately!


I can never have enough bookmarkers because I hate to dog ear my precious books (although I still do sometimes) and this little cork one is very special to me!

Favorite Recent Monthly Purchase


As part of my monthly Etsy tithe (I am committed to putting 10% of my Etsy profits back into Etsy each month) - this is my favorite October purchase. They are the sturdiest and most amazing bibs you can imagine! I was tremendously impressed and the little mama I gave them to was, too! Check out Mandolyn's amazing shop THE pretty BEAN committed to recycled plastic bags. This may also be a good place to donate your bags!

How to Make Sure Trash is NOT What's for Christmas This Year


This holiday season give our beautiful planet the gift of wrapping green - think recycle and reuse.

I love having amazingly wrapped presents under my Christmas tree, but cannot stand the thought of that same beautiful wrap still sitting in a landfill when my great-great grandchildren are opening their presents! Forty percent of our trash comes from paper products and over 900,000,000 trees are destroyed annually to provide the United States with this paper. When we send paper to a landfill it is typically compacted and sealed into an airtight hole in the ground where it is unable to decompose and becomes perfectly preserved. Decreasing the amount of trash we have this holiday season, even a little bit, can have a dramatic impact. It is always up to you if you want to add to the problem or add to the solution!

The most important thing you can do is to be conscious of what you are buying and its packaging. Purchase products with minimal packaging. When choosing between two similar items, go for the one with less packaging. Choose gifts that replace disposable products. Cloth napkins, .
crocheted dish scrubbers (Curly Girl Crochet) and electric razors all reduce the consumption of throwaway products. Use less wrapping paper. You can reuse old posters, maps and newspapers. Say no to the metallic paper that cannot be recycled- stick to recyclable paper. There are also sites that sell amazing hemp paper with soy based inks that decompose very quickly. A great idea for kids is to buy a large kraft paper roll at the office supply store and have them decorate it - I did this with my daughter a little bit each night between Thanksgiving and Christmas- then set the roll out for Santa to use on Christmas Eve (then toss the paper into the recycle bin instead of the garbage bin on Christmas morning). Give gift bags that can be used again and again. This year put your gift in one of those very inexpensive store brand shopping bags or canvas bags and nixing the tissue paper for recyclable comics give the gift they will use again and again. There is a talented seller on Etsy named ZJayne who makes reusable shopping bags out of t-shirts that would make amazing gift bags! You can make your own bags from your extra material and yarn just like Fisheye's! shown here. Her shop is filled with amazing upcycled handbags and more!

Also think reuse- and you will wrap green and save some green in your wallet at the same time. Why buy shirt boxes when your house is probably full of boxes right now. Cereal boxes are the perfect size to wrap lots of goodies. I like to use the boxes sans wrap, but if you must wrap the box think recyclable paper again. Mark all your gifts PLEASE RECYCLE ME (I print this on the back of my gift tag). You can get creative with this and use a cereal box for slippers, a dog food box for a dog sweater, etc, but the main idea is to reuse what we already have, so we are not wasting our planet's precious raw materials creating more throw away products.

Send out your holiday cards electronically (I can't bring myself to do this because I love to send and receive cards too much!). Use last year's holiday cards for this year's crafts including your gift tags, postcards throughout the year (cut off the backs), press them between 2 sheets of contact paper for holiday placemats or hang them on this year's tree. NestaUSA has some amazing cards this holiday season. I send my old cards to a wonderful St. Jude's program where children at St. Jude's Hospital earn money by creating new holiday cards from old cards. You mail your cards to St. Jude's Card Recycling, 100 St. Jude Street, P.O. Box 60100, Boulder City, NV 89006 - mail them USPS bound printed matter and they will be inexpensive to ship. And since it is the time of year when our mailboxes are stuffed with paper almost daily - get yourself taken off catalog mailing lists that you do not use. Call the Direct Marketing Association Mail Preference Service at 1-212-768-7277.

If we each make it our goal to eliminate that trash bag full of gift wrap this season - just imagine how this effect will snowball. Let's give the gift of an empty space in that landfill where our trash would have been!

Question of the Week


This week's question goes to Vincent Corona-Evans (somethingwhimsical) the maker of those little BOB guys and a wonderful illustrator about his earliest art memories (he takes us deep into his psyche with this one) and this is what he had to say: "My earliest "art memory" is broken up into several glimpses and/or happenings that may or may not have occurred to me between the ages of four to seven. There is a perplexing phenomenon that happens inside my head when I think of such events that far back. I tend to blur and confuse factual moments that have actually happened with stories that were told to me about other people by other people. So although I believe the small list below to be events from my life, I must concede, reluctantly, that these may just be snippets of stories told to me.

#1 Art memory: (This memory is definitely mine.) Playing with pasta letters on a fold-up card table with newspaper on it. I remember thinking how cool the letters looked even though I couldn't read yet. I pretended to write words by putting them in long lines and then asking my mom to tell me what I spelled. This was my first tangible memory of my love of pretending. Pretending was my creative inspiration. I'd pretend I was on a planet, and I would draw it on paper and there it was. I remember having paper beside me almost every time my mind created some new adventure. I look back in old notebooks and I see layouts of houses and landscapes, and musicians with instruments and whole stage diagrams. Cars, boats, planes, spaceships, superhero costumes, you name it. Not a single one of those drawings didn't have a whole days worth of fantasy wrapped around it.

#2 Inspirational: I remember being made to draw on red construction paper and then being forced to cut the drawing out with crappy scissors. I don't know what this means, but I remember it like it was yesterday and I still feel frustrated by it. (This would make me laugh if in fact this wasn't my own memory.)

#3 Something like that: Seeing the Easter bunny in my back yard. I know, at first, this may seem derived from a WB cartoon and completely none "art" related, but this felt so real to me and has had such an impact on me it just has to be true. Several things stuck out about my encounter that day as well. First, this thing was man size. I mean huge and fat and tall. And not that fast. It hobbled out slow on its hind feet from the tall weeds growing behind our house. Then it stopped and noticed me and just stared. I was frozen with fear. That big round rabbit face just stared at me. Terrifying. I do remember even in my anxiety thinking this is strange. Not to mention, it was fall. I think. October or November. I ran back into the house to tell everyone what had happened and no one really responded at all or even looked down. I still believe I developed a stutter at that moment tugging on their pant legs.

So in wrapping up, these memories came the quickest and climbed the highest among fact and uncertain fact. Leaving me with an interesting self-examination. I still live in a world of make-believe regarding my work. I'm frustrated by tasks with crappy equipment, and to this day I need people to look at me when I talk. Oh yeah, and I don't even know if this is me I'm talking about. :) (love ya Vin!)

Tips for Photographing Jewelry from the Amazing Kella MacPhee


Today I asked my favorite Jersey Girl Photographer Kella MacPhee - check her out and prepare to be blown away - for some quick tips to better jewelry photographs. Kella says - Interesting + FAKE IT LIKE A PRO photos can be achieved in 3 steps! #1 Light. Turn that blinding automatic flash off! The built in flash on a camera is a photographer's worst enemy and will ruin any shot. Your best bet is to invest in a lightbox, they are not too much money and will ensure that you get even light and the proper white balance every time! {www.bhphotovideo.com} This will eliminate the need to fuss with camera settings before photographing your products each time. If you're saying to yourself, hey I'm a starving artist here, I don't have money for a fancy lightbox, but still want great photos try cheap, however unpredictable sunlight! Not as practical as the lightbox, but beautiful none the less. Some examples would be the soft and diffused light of a window {try setting up a table with your art next to a window} another option is venturing outdoors. Two rules to keep in mind: first you stay out of that midday sun- your photos will have harsh shadows and be blown out! {even your jewelry does not like to look pasty} {early morning and late afternoon are best} and 2. when shooting outside in light other than those great early morning hours and the "magic hour" before sunset, look for even shade, there is nothing worse than mottled light. Using light properly will ensure you have clean, evenly lit, pro looking pics!
#2. Angle. Change your angle. Eye catching photos are created by thinking outside the box. Long gone are the days when photos need to be shot straight on.. so 1992 and so boring! Try setting your camera down and shooting at the same level as the product. Another technique is to shoot up at the product... creating some drama. Shooting straight down and I mean straight down, get your butt up on that chair can also be interesting and modern. Play around and have fun, look at some of your favorite sellers and see what it is about them that is catching your eye.
#3. Composition. Think outside the center. Centered images are boring! Negative space is king! Try placing your product on the left side and leaving the right side empty. Interesting photos are not always achieved by filling up space. Leaving room for your products to breathe can create these artistic + pro images you're after. Check out these beautiful photos by lilfishstudios and tqbdesigns.Another method is layering, now this is where it gets technical, for all you point and shooters out there cover your eyes. Gosh darn it control that depth of field if using a manual camera, think larger apertures like 2.8 or 4 {I know these seem like small #'s, but they really are large and let in more light, creating only a small portion of the image in focus.. yada, yada} by using a shallower depth of field and being in control over what you decide you want in focus, you will instantly have more professional pics. So show a variety of pics on your page, but maybe one can have a the pendant of your necklace in focus while the chain is not. Some of the most interesting photos are only parts of subjects, leaving the viewer intrigued or an interesting composition allowing your eye to move around the image.REMEMBER you are artists appealing to creative buyers .. this is not ebay.. the first thing people see is the photos.. be creative and HAVE FUN!

Don't you just love this...


because the world is so fast and so small... this is a poem from issue 12 of a wonderful little collection called Words Dance from VerveBathPress on Etsy! I just love this!

New Stuff Added This Week To My Shops


The following items were added to my Etsy shops this week. UNCORKED now offers CLIMB which is my little tribute to the amazing Randy Pausch whose words "brick walls are there for a reason, they show us how badly we want something" really struck home for me.

POLARITY now offers a THANKFUL Thanksgiving set which will also be available as lids. Happy Shopping!

Question of the Week


This week I am asking crafty Miranda Layton of Buttonenvy about her earliest crafty memories and here is what she has to say:

When I was five my cousin moved two hours away. She is three months younger than I am and, at the time my constant companion and only source of sibling interaction. I was devastated. To console me my grandmother gave me a dollar for the ice cream man and, for the first time let me go outside by myself to purchase my frog pop. This is one of my first clear memories. When I had finished my ice pop she told me we could save the stick and, after we had enough of them, we would build a little box out of all the pieces we had collected. This started my craft as therapy addiction. A few years later, when I had learned to read, I started to hoard the Rag Shop fliers from my grandmother's newspapers. I would plan how to spend every cent of my five-dollar weekly allowance. On the way home from a weekend spent with her my mother would stop there, and I would fill up on plastic visors and puff paints. This was the eighties remember and puff paint seemed like a craft revolution. This will lead into a long list of crafty business ventures.

SMIDGE Blogs About POLARITY!


A great big thanks to another Kat - the amazing editor at Smidge - for this wonderful shout out about Polarity's recycled lockets!

Make a RECYCLED JEWELRY CASE


These are the instructions to make one of my jewelry cases from old frames. This will be featured on a new how-to blog - if anyone making one of these would like a free test tube with cork and hardware (just pay $2.00 shipping) drop me an email cat@olivebites.com - enjoy!

Is your jewelry all knotted together in the bottom of a drawer? Are you always looking for a piece that you know “is in there somewhere” – well, this is the perfect solution to begin to untangle your messy life ….


Stuff You Will Need


2 picture frames of the same size (the deeper the better with square edges)
2 hinges with hardware
1 latch with hardware
foam board (cut to fit inside one of the frames)
fabric (dense weaves are best)
a piece of glass to fit one of the frames
silicone sealant (clear for kitchen and bath)
staple gun
glazier points
hanging hardware (saw tooth hanger)
drill or dremel
clamps
screwdriver

Step 1 - Line Up Your Frames

Marry your frames – stand them up on a table and make sure they fit together perfectly (place interiors together). Mine are square and sometimes I have to turn one in a different direction to get the perfect line up. Check your corners and sides. If your frames are out of line – give them a quickie divorce and get yourself two frames that want to live happily ever after together… skip this step at your own risk…..

Clamp your frames together –wrap cardboard to protect your wood and then clamp your two sides together (interiors facing each other)


Step 2 – The Hinges


Line up the top of the hinge with the top of the interior frame cutout and repeat for the bottom, set your hinges in place, mark screw holes with an awl or pencil (I actually use jewelry tweezers), remove hinges, pre-drill holes for hinges, secure hinge hardware with a screwdriver

Step 3 – The Latch

Determine which frame will be the front of your jewelry case. Measure to find the center (unless you are an off-center kind of girl), lay out your latch so that it opens toward the frame you would like to be the front of your case, mark screw holes with an awl, pre-drill holes for latch hardware, secure latch hardware with a screwdriver. Blow out any sawdust from the frames and wipe clean.

Step 4 – The Glass

Clean your glass; I know you are just going to get it dirty again, but you need it clean for a good seal and you want to check for any scratches or mars. Open your case. Lay your glass into the front frame. Gently hold a slight pressure down on your glass as you apply a continuous ¼” (approx) bead of clear silicone along the entire inside edge of the front frame; applying the silicone to the location where the glass meets the frame. This will hold the glass in place. Allow this to dry for 24 hours.

Step 5 – The Big Finish

Lay your foam, which you have cut to fit inside the back frame (I cut my foam with a mat-cutter but you can use a razor knife), on top of the fabric you will be using as a backdrop for your jewelry. Cut the fabric about 2” larger than the foam all the way around (you may want to iron your fabric at this point). Fold the fabric around the foam
(with the outside of your fabric facing away from the foam) and secure it with a staple gun. I use 6mm staples so they will not poke out the other side. Staple one side and then the opposite side pulling tightly until all four sides are secured. Fold your corners like you are wrapping a birthday present and staple. Cut away excess fabric.

Cut a piece of cardboard the same size as the foam (usually something you can use will come with the frame) – lay the cardboard into the back frame and lay your fabric covered foam panel on top of the cardboard.

Use a screwdriver to push 8 glazier points into the frame on top of the fabric panel (two points on each side).

Add your hanging hardware to the back by measuring to find the center and then nailing in the hardware. Use a long saw tooth hanger so the case can be adjusted for weight when hanging.

Using corsage pins (available at craft stores, florists, etc) you can hang your jewelry in style!

You can also make 2 fabric panel frames; attach them with the frame outsides facing together (opposite of above) and create an amazing display for your dresser!

Australia's Girl Guides Leading the Way in Cork Recycling!


I used to be a girl scout and loved wearing my badge sash and sewing on the little badges! The Australian girl scouts (called girl guides down under) are leading the world with their wine cork recycling program.

Last year Guides around Australia recycled 60 tons of cork, that’s the weight of 20 elephants or 1800 ten year old girls.
In 2007 $100,000 was raised for Guide programs and activities from cork recycling!

These girls are definitely rocking the cork recycling world!

ME Featured Artist of the Week


A thank you to my buddy Amy at ThePeachTree
for her terrific blog feature of my Etsy shops!

Craft Show Tips & Tricks - Selling the Benefits of Your Handmade Craft


I have done so many shows with my work (which has changed from prints to collages to jewelry) over the years and I am always surprised at how many online sellers of art and crafts do not sell at craft shows.

Shows can be a great way to get your work seen, see what customers respond to and make some real bucks. I have made as much as $6000.00 (gross) at a 3 day music festival with an average price point of $20.00 (lots of work and lots of fun and way worth it).

I have also made $50.00 in sales at a street fair where I made $1500.00 the year before, so as with most things in life worth doing it is hard to know for s
 ure what will happen, but there are alot of things you can do to get the most from your day.

Selling the BENEFITS of your work at a show

I attended a seminar of features and benefits training many years ago that seemed hokey to me at the time, but sometimes comes in handy now. Basically your product

(yes, I am afraid our precious art is also a product)

has features that are cool but what the customer wants to know about is the benefit to them. One of the "products" I sell are little lockets made from recycled auto parts that have magnetic, changeable lids.

Now when customers would approach them, I would say "these are made from a little recycled auto part" and they would usually go "oooh" and then get kind of glassy eyed

(I still cannot understand why people do not see the benefit in having an auto part hanging around their neck)

then I would say the top is magnetic and you get to choose 3
  tops so you can mix and match - well that was when they perked up.

The problem was that in a busy show- I didn't always get to that part before their eyes wandered. It didn't take me long to realize that what I thought was the coolest part - the auto part that seemed so clever to me - was not the benefit (or selling point) for most customers- so I started talking about the magnetic lids first and putting them in people's hands

(the lids clicking off and on are somewhat irresistible to us fidgeters)

and my sales went way up.

I did a show recently with a guy on Etsy named Vinnie (somethingwhimsical) who sells these little BOB (bunch of bolts) necklaces and every time a customer approached and smiled at his necklaces he would say "they come with an instruction book".

(I heard this about a hundred times that day- I still hear it in my sleep)

Now this instruction book is really something else- it is cool and clever and witty, but maybe not the first "selling" benefit to the customer.

When his wife was nearby she would chirp in with - they are called BOB for bunch of bolts and also named as a homage to Vinnie's father BOB who made these for him as a child- well that was the grabber to people because it made it personal and a little story that they loved even more than the alien story in the instruction book and they would be hooked.

Often you are the benefit and the selling point to the customer. I once did a show with another Etsy seller (briefmoments) who sells these gorgeous kaleidoscope pendants.

Now as soon as a customer approached, Maribeth would immediately OWN her work. She would say "I make these from bits and pieces of my photographs" and then go on to explain her process. People were immediately intrigued and because she was so enthusiastic (and her work so gorgeous) she sold tons that day.

This was her first craft show and my 30th plus, but I learned something very important from watching her OWN her work.

So now instead of saying "these are made from a recycled auto part" (not the first thing I bring up but I do say it), I say " I clean, drill and solder these from a recycled steel car part" - the "I" is the important part because the benefit is the handmade part- why would the customer pay me more than they would pay at Walmart - well, because I am a talented. amazing artist and I made it! OWN your work!

As an artist you are selling a piece of yourself with every little piece of art that you manage to part with.

The customer wants to know you; they need to know you. Save a part of your display area for a little 'self-tribute' section- set up newspaper stories, any articles you are in, books you are in. You can put pictures of your work in a book very inexpensively and it makes you look very impressive to potential customers.

Photos of your work being worn or used are great for shows. A photo of yourself with your own little story - is a must. I sometimes set up a laptop which flashes pics of my work and it draws people in. It also contains recycling info on cork and steel and helps to make me memorable.

You could go overboard with this- remember we are not DaVinci- but we are the creators of our own amazing work and if we are not impressed with it no one else will be either!

SAVE MIQUEL


The Portuguese cork industry has begun a campaign designed to argue for the greenness of corks versus screwcaps and plastic wine stoppers.

Cork is natural, completely biodegradeble, can be easily manufactured and recycled without producing toxic residue - in fact all the things screwcaps and plastic stoppers are not!

Furthermore, harvested cork trees absorb 3 - 5 times more carbon dioxide than non-harvested trees and cork harvesting is a vital source of rural employment is done without chemicals and fertilizers and without destroying the cork oak.

I get my cork for my uncorked jewelry from the wonderful harvesters of Portugal and they need our support! SAVE MIGUEL Buy your wine with cork stoppers guys!

happy labor day weekend!

my kind of dandelion - make a wish!

04/11/2006 Andre Kutscherauer

Trunkt Live

My Trunkt portfolio is still pretty bare, but at least it's live!

summer is ending...


Well, summer is ending and it kind of feels like it never got started. All I have done is work, work, work. Got accepted into Trunkt yesterday...after 2 denials...so that was a yippee moment. Will set up my portfolio this weekend. Am also working on a new kid's line for Polarity and Uncorked before the holidays and trying to plan some time to get away while the weather is still good and the water still warm down south, but not too far down south....

WELCOME to my new studio late summer 2008!
..well...not actually a new studio, but my studio with a new name (formerly Dream Scenes Studio)...renamed for a fresh start, a new year (doesn't it still feel like the year starts in September) , a new adventure and a new puppy named Olive ... who ... you guessed it ... tends to bite ...this is the journey from conception of two little jewelry lines called UNCORKED and POLARITY; conceived last year around the same time a little puppy named OLIVE was being born, and my efforts to bring home the puppy chow with my studio and teach my puppy not to bite the hand that feeds her or at least the hand that is trying to....