Showing posts with label tutorials. Show all posts

Upcycled DIY Tutorial - Cookbook and Spoons into a Spice Pinch Caddy!


Now, Martha likes to keep those little bowls of salt and pepper handy for adding pinches while she is cooking

(and she is the queen of all things crafty after all)

and it is a great idea!

So, this is my version of Martha's pinch bowls.

You will love having open spices to add to your favorite soups and sauces as you cook!

And this is an easy, peasy upcycled project.
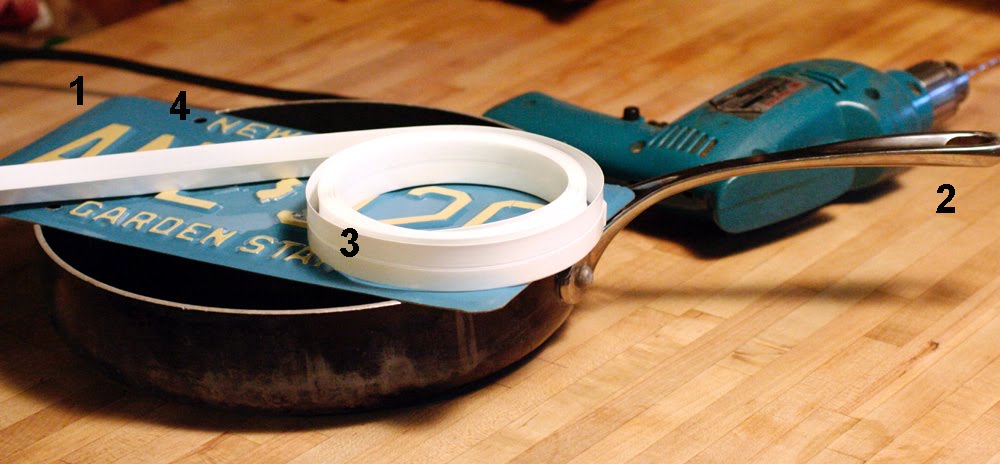
You will need:

1. a hardback used cookbook
(make sure you copy any recipes you like first)
2. old spoons (use ladles or you will have to bend them, which is easy actually- just bend slowly)
3. a large sawtooth hanger
4. 4 screws, washers and bolts
(the screws need to be just a wee bit longer than the depth of your book)
5. 2 copper pipe hangers (bring your spoons to the store when you buy them)
6. a drill and hammer (camera shy)


1. measure and hammer in your sawtooth hanger
2. line up your spoons and copper pipe hangers and mark your hanger holes (I wanted my copper pipe hangers to be in different places so bent one spoon slightly)
3. drill your starter holes and drill holes slowly

(remember this is how you started a fire when you were a girl scout, so drill SLOWLY)

4. screw in your hangers and add bolts on back
5. add your spices and you are all set


Here is another recycled book post you might like Baby Got Book.

And some amazing creations you can buy now on Etsy:


1. Gorgeous and clever recycled spoon necklace from Under Glass.
2. The Black Spot Books stunning handmade leather library
3. Beautiful spoon garden marker by Monkeys Always Look
4. Amazing book safe by Pommesfrites
5. Adorable mini wooden library book by Elloh

A License Plate to Dustpan DIY Recycled Tutorial - Time to Clean Up!

In New Jersey if you do not turn in your old license plates you face huge fines and can even lose your driver's license,

(so, don't ask me where I got this one - I actually have about 10 in a backyard shed which I am hoping the police don't stumble upon, if one of my neighbors - jealous of my crafty nature - turn me in)

but if you live in a state that is not quite so greedy about getting these back and happen to have one that you are not using why not turn it into a handy little dustpan!

You will need:

1. a license plate

(please do not steal this from your neighbor or mother-in-law)

2. an old handle- I removed this one from an old frying pan that I ditched due to teflon and have been trying to recycle
3. 11 1/4" of weatherstripping
4. new bolts for your handle- complete with washers and nuts
5. a drill, some clamps and a marking pen

1. determine the size of the 'fold' for your plate based on your handle and clamp your plate to the edge of your work table upside down
2. gently and firmly bend your plate - working your way a little bit at a time across the plate- slight bends; you will probably need to bend across the plate 3 or 4 passes - if you have a rubber mallet - it could come in handy here

(note - I have a rubber mallet and spent more time looking for it than making this dustpan and of course, it only turned up the next day when I didn't need it anymore)

3. measure and mark your handle holes
4. if you are using large bolts- drill a starter hole with a small drill bit and then drill your larger hole with the correct size bit
5. remove your clamps and bolt on your handle


6. cut your weatherstripping to size
7. peel off the sticky paper from the one side of the stripping and press the edge of your license plate on top of it
8. make any final adjustments to your license plate fold and you are done!

And for some amazing recycled license plate creations you can buy now check out this total gorgeousness on Etsy:


1. Journey license plate word block by Recycled Art Company
2. Recycled license plate monogram necklace by Wearwolf
3. Quebec license plate photo album by Tagliatela
4. Say What? license plate belt buckle by Vintage In Retrospect
5. New England Girl license plate bracelet by Etcetrix
6. License plate frame by RandiTan

What's Your Racquet? - Tennis Racquet to Cork Board DIY Tutorial


Recently I picked up a couple racquets at a local flea market.

I had seen some tennis racquet mirrors on Apartment Therapy some time ago and I loved them, but knew working with mirrored glass would definitely be seven years bad luck for me, so thought I would try a similar kind of thing with cork.

So here is an easy, peasy tutorial to turn your old racquet into a cork board message center.

You can make them with or without a fabric covering - I am making these two as a gift and this fabric is perfect for the tennis nut I am thinking about.

You will need:

1. racquet(s)
2. cork
3. fabric
4. cardboard
5. paper
6. staplegun
7. scissors
8. screwdriver
9. glazier points


1. Create a paper template by making dots along the inside edge of the racquet
2. Adjust your template until it fits perfectly inside the racquet
3. Use the template to cut the cork and a piece of cardboard
4. Iron your fabric and using a staple gun wrap the fabric around the cork and cardboard; secure tightly
5. Using glazier points (used in framing) and a screwdriver secure the corkboard into the racquet


Note- those framed prints in my livingroom (top photo) are by the amazing f2images!

1. Vintage tennis racquets at BrightWallVintage
2. Art for Dogs by StrayDogArts
3. Short white skirt by LaBronz
4. Tennis ball cufflinks by QA Create
5. Tennis ball bath bomb by Layla
6. Cats Playing Badminton Brooch by Bramble and Bear

No More Wire Hangers! but first you can use one to make a business card or place card holder


You can easily use a wire hanger and turn almost anything into a business card holder, place card holder or photo holder.

Here I use a little vintage child's block, but anything you can drill 2 holes in, will probably work!

What you need:

1. a wire hanger
2. wire cutters (I use these to cut sheet metal, so they are heavy duty, but smaller ones will work, too)
3. something round such as a foam brush handle, pencil, etc
4. a drill
5. your block or holder
6. your business card or photo


Using wire cutters cut 6-7" of straight wire
Wrap the wire tightly around your foam brush handle or pencil twice
Give a squeeze with a pair of pliers (I actually stepped on mine, but this seems more professional) to flatten your wires
Mark your drill holes by measuring each side of your handle (or whatever you used as your rolling template)
Drill 2 holes, push in your wire ends, add your business card

You can use the same wire technique to make place card holders or recipe card holders out of your salt and pepper shakers- if the wire hanger wire is too thick, you can use 18 gauge wire from the hardware store or you can even cut down large safety pins! Just use a round winding template that is the thickness of the space in between the holes.

Thoughtful Thursday - Bling It On or How to Make a Lucky Number Necklace


This is a fun piece that I made for a friend's housewarming party (she collects gnomes), but it would also make a great idea for a lucky number or initial necklace!

My friend likes big jewelry, but this can also be made in a smaller size or would make a great accent piece hanging on a mirror or frame.

(and everyone needs at least one piece of big chunky jewelry in their closet, right, plus I know you are really into the industrial bling ... or was that Fergie?)


You will need:

1. metal house number (these come in all sizes)
2. hardware - washers, eyehooks, screws
3. doodads for hanging (beads, charms, etc)
4. neck chain
5. jump rings and slip rings
6. power drill (drill press preferred)
7. pliers


1. Decide on the placement for your doodads (bottom, sides, front) and mark your locations with a marker. Drill a hole (smaller then your eyehook) on the top for your chain and on the marks you have placed for your doodads.

2. Screw in your eyehooks and washers. Add slip rings or jump rings.

3. Add your chain and doodads.

Your only limit is your imagination- you can decoupage parts of the number and even hang your number horizontally for added interest!

How To Make a Magnetic Test Tube Terrarium or moss on your fridge is way cooler than mold


I have been slowly adding some test tube terrariums to my Etsy shop- they are for charity and quite different from these, but I thought I would give you a little look into how the terrarium part is made.

To make one of these you will need:

1. a test tube with cork stopper
2. pen and paper (don't worry you won't have to actually draw anything)
3. a neodymium magnet - I never work with these things because they are way too strong for my usual work (and scare me)
4. rocks
5. charcoal (think fishtank)
6. moss (or some small terrarium plant) and dirt
7. some kind of long skinny plastic thingie
8. super glue


1. Put some super glue on your magnet and gently but firmly place your test tube on to the glue

(try not to glue your fingers together, break the test tube, cut yourself with the broken glass or screw this up in some other way - at this point you are probably thinking that it might be easier to just buy one of these from me and that is exactly what I want you to be thinking)

Hold it in place for a bit and then let it set- prop up the other end with another magnet- over night.

2. Roll your paper around your pen to form a tube (the paper should be longer than your test tube) and place the paper in the test tube

3. Add some rocks, followed by some charcoal followed by some nice rich dirt

4. Remove your paper and tap down with your plastic thingie

(if you try to use a metal thingie, it will mess with your magnet and you will be sorry, but again it may get you thinking you should just buy one from me, so maybe go ahead and stick a screwdriver in there)

5. Carefully drop in your moss (or plant), tap it down gently with your thingie, mist with a few drops of rain water (or tap water, but collect some rain for future waterings- I say give the moss what it would naturally get)


6. Cork that baby up and hang it up somewhere you will get to see it. By the way there are over 12,000 species of moss- I recommend Jersey moss because it is very hardy having grown up listening to all those awful Jersey jokes- which are untrue ... mostly.

Recycled Christmas Countdown ... more reasons to drink more wine


While you are getting merry this season with your favorite bottles of red and white -start saving your wine corks

(you may already have a nice little collection)

and turn them into amazingly awesome Christmas tree ornaments!

A little cork education:

Cork is the bark of the cork oak tree. Most cork is grown in managed forests, primarily in Portugal and Spain, where the cork is carefully harvested in a centuries-old tradition using hand tools and without pesticides or fertilizers ensuring the trees will remain undamaged.

To make these little beauties you will need:

Corks, Buttons, Glue, Pleather Cording, Eyehooks, Slip Rings and Some Cute Little Christmasy Things to Hang From Your Corks

1. Start with a button that is about the size of your cork or a bit larger and thread it with a strand of pleather from the bottom up
2. Stack on a few more buttons and tie it off. Give your pleather a few more inches for hanging and trim.
3. Using a pair of sharp little scissors dig a little hole in the top of your cork so your bottom button sits flat
4. Glue the button to the cork and let this set
5. Twist an eyehook into the bottom of your cork and add a slip ring
6. Now you are ready to add any cute little Christmasy things you can think of to dangle from your corks


OK, I have to admit this is a re-post from last Christmas.

I'm actually at the mall right now looking for a parking spot or maybe at our town's tree lighting ceremony- which is actually held right across the street from our house- yup, lucky us- but they give us jingle bells for our shoes and we really, really want those bells, so even though it is about minus 20 with the wind chill we will be there.

and this post is for your own good anyway, because wine is very good for you- at least red wine .... plus it is low calorie ... really

Note to my scale- please be kind today- I'm hoping for a .6 loss - that's all I need-and if it happens, we'll totally be BFF forever.

OK, off to get my jingle bells.

Recycled Christmas Countdown or baby got book

This is part 5 of my weekly series on some recycled and repurposed Christmas gift ideas- things that are easy enough to make fairly quickly, but still look like you put the proper time and thought into them.

I love little knobs and hangers and hooks and doodads and pick them up at garage sales and Anthropologie's sales racks whenever I have the chance- not knowing what I am ever going to do with them.

They make great little hanging racks but attached to a piece of wood they are just so 'been there, done that'. Attached to a book they make an amazing, recycled little hanging rack!


1. Gather your supplies: books that you don't mind drilling holes in- I know this is going to hurt all you bibliophiles, but sometimes art hurts folks (the books should be the same thickness as the length of the screw attached to your drawer pull unless you have some heavy duty wire cutters like I do), your doodads and sawtooth hangers

2. Mark the spot(s) where you want your hooks.

3. Drill your holes - note- when I drilled the very thick Harry Potter book, I smelled smoke and thought I had started a fire, so maybe thinner books are best or that could be just a little of the Potter magic leaking out

4. Clean the drill area flush with a razor blade

5. Add your drawer pulls with washer and bolt on back

6. Add your sawtooth hanger with a hammer
Some simple wrap (Target giant lunch bag - just how big have our lunches gotten I'd like to know- run through an inkjet) completes the gift!

Recycled Christmas Countdown or saving your digits the old fashioned way


This is the 4th part of my weekly series on some recycled and repurposed Christmas gift ideas- things that are easy enough to make fairly quickly, but still look like you put the proper time and thought into them.

I don't know anyone's phone number anymore because they are all stored in my cellphone and when I forget to charge it

(all the time)

I am left wishing I had my memory back

(from before I lost it being a mom)

or that I had a wonderful old rolodex!

You will need: a can (cut out both ends- you can't do this with all cans these days, but there are still some out there), a magazine, index cards or cardboard and dividers (you can make these pretty easily, but I just happen to have some purple ones)


Step 1- Gather your supplies, cut both ends from your can and peel the label

Step 2- Find an interesting picture page in your magazine (the magazine can be new and part of the gift or you can recycle one of your old ones)

Step 3- Tightly roll it up and slide it into the can

Step 4- Trim your index cards to about 4" square (square just seems better somehow and it also stands up perfectly for some reason that I can't figure out)

Step 5- Slide your dividers and cards into the pages - instant modern, recycled rolodex!


Some simple wrap (Target giant lunch bag run through an inkjet) completes the gift!

Recycled Christmas Countdown Part III or what to do with those empty bottles

This is the third part of my weekly series on some recycled and repurposed Christmas gift ideas- things that are easy enough to make fairly quickly, but still look like you put the proper time and thought into them.

This is a modern take on the romantic cut flowers in a recycled glass bottle that we have all been doing forever.

You will need a bottle of something as a gift or an empty bottle you have on hand (wine, classic soda, some special something), a 3/4" galvanized split ring hanger (plumbing department), a 3/8" galvanized ceiling flange (plumbing or electrical department), 3/8 threaded pipe cut to size (store will cut), #12X1" screws.

These parts are actually pipe hanging gizmos and come in copper and galvanized steel and a mix and match assortment will look great.


This one is actually too easy for step by steps. The pieces all fit together neatly into an adorable little industrial hanger. They also come in different sizes for different size bottles and jars. You can fill an entire wall with these and it would look amazing!


Once again for some easy packaging grab a few of these larger size lunch bags (found at Target) that you can run through your inkjet with some clever wording.

Recycled Christmas Countdown Part II or start saving those coffee cans

This is the second part of my weekly series on some recycled and repurposed Christmas gift ideas- things that are easy enough to make fairly quickly, but still look like you put the proper time and thought into them.

This makes a great gift for the coffee fanatic on your list and you can make the same style clock for a tea lover, too- the tea tins are sometimes (often) better than the tea.

You will need a coffee can, coffee scoop, clock hardware, hanging hardware and a drill.

I cheated a bit because I already had these great magnetic hooks that I got at Staples (which I used for the bottom to hold the coffee scoop), but you could definitely screw an eyehook into the bottom of the can very easily- just start with a tiny drill hole.

1. Clean out the can- although leaving a little of that coffee smell in there could be a good thing

2. Drill (or drill and punch) a hole in the can for your clock gizmo (empty side of can on top)

(a word about clock gizmos- they are super fragile- so be careful- I immediate bent my second hand into something that resembles the state of Rhode Island, but since this gift is recycled and the recipient just happens to really like Rhode Island, not sure how I know this about him, it is ok ... probably)

3. Insert the gizmo through the back- you will probably need the directions to figure out the order of the little parts- and if you are like me and tend to toss them before you start- this step may take awhile

4. Screw eyehook into can bottom

5. Add hanging hardware to back of can (I suggest 2 sets of hardware - one top and one bottom, so when the person grabs for the coffee scoop they don't pull their clock off the wall)

6. I love packaging things in these larger size lunch bags (found at Target) that you can run through your inkjet with some clever wording.


Recycled Christmas Countdown or if we are going to eat this sugary stuff let's recycle the boxes

My plan is for a weekly post on some recycled and repurposed Christmas gift ideas- things that are easy enough to make fairly quickly, but still look like you put the proper time and thought into them.

Now I know we shouldn't be eating this stuff, but some of us do have a collection of these cereal boxes from overnight guests

(uhuh)

and I especially love the little mini assortment packs.


1. Glue the top flaps open. For stability you want to leave them on rather than rip them off- a glue stick would probably work just fine for this.

2. Using a razor knife or scissors cut a larger package (carnation instant breakfast packaging show here) open and glue the flaps back

3/4. Add little scrapbook doodads to the sides of your boxes- there are tons of variations here, so just use things that you have when possible.

These cereal boxes could also be made into little books and albums in this same way. Large cereal boxes also fit nicely into those plastic crates in your kids' rooms.


Mini Cereal Box Storage Unit (especially great gift when paired with one of the amazing Etsy finds below)


1. Hawaiian Coconut Bowl by Glazed Over
2. Favorite Plaid Shirt Print by LittleBranches
3. Coffee in Color Notecards by ThingsThatAreMade
4. Rice Cereal Upcycled Journal by IvyLaneDesigns.
5. Vintage Recycled Quilt Coasters by RikRak
6. ID Bracelet by Spoonerz
7. Fork Shirt by Xenotees